
30 Jun
Spilling hot grease or red wine can ruin a porous outdoor patio floor in seconds. Choosing a dense material protects your cooking space from deep food stains and weather damage. This choice keeps your backyard looking pristine for years.
Request free project design support for your outdoor kitchen floor.
Porcelain pavers for outdoor kitchen floors can create a durable, cohesive base for cooking, dining, and gathering. The best result starts with a verified product choice, a clear layout, and a coordinated sand-set installation plan. Samples and design support help you assess the color, scale, and intended use before work begins.
Planning a great cooking area means thinking through easy cleanup, movement, and long-term use. Many homeowners want a strong surface that also ties the kitchen to nearby outdoor spaces. The sections below explain the choices to review before installation.
Porcelain pavers work well for outdoor kitchen floors because verified outdoor-rated products combine dense construction, low maintenance, and stain resistance. Hardscape.com offers residential 2CM options and heavier-duty 3CM options, while samples and project design support help match the product to the layout and expected traffic.
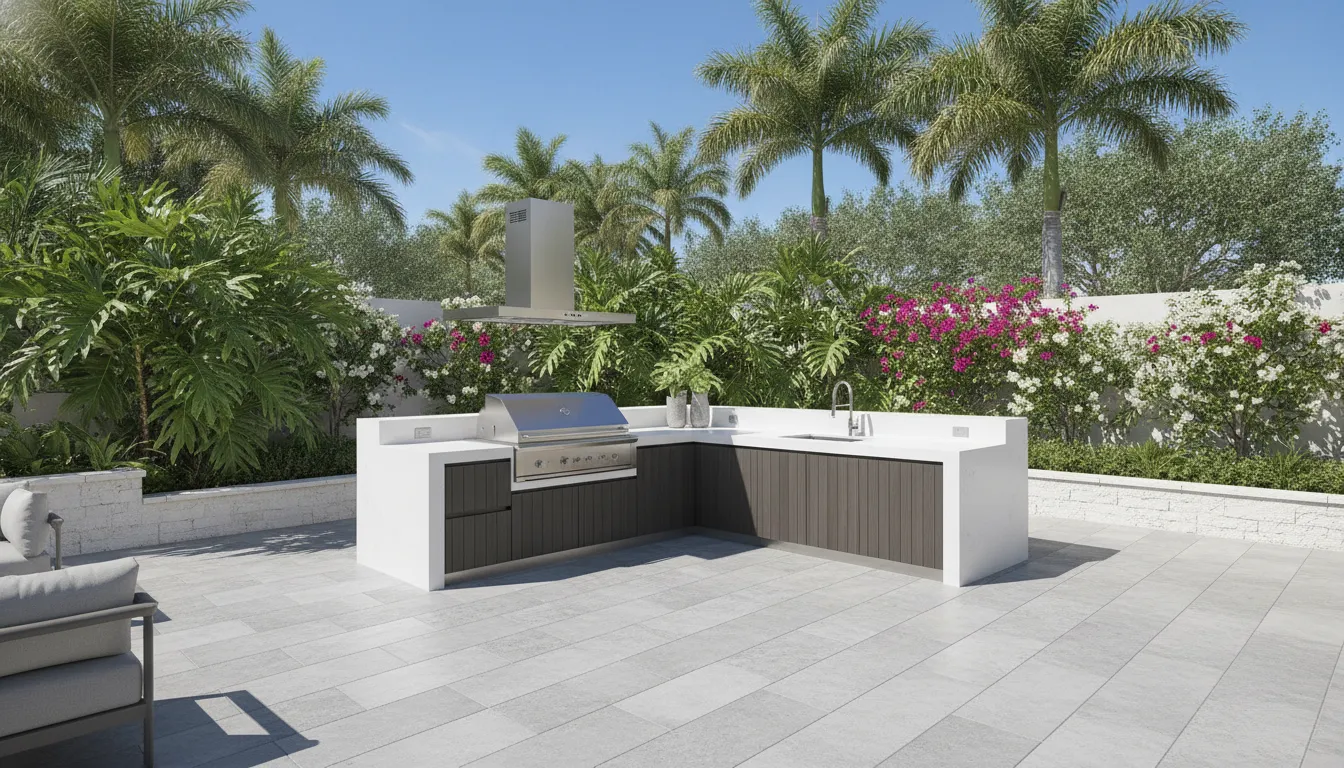
Porcelain pavers are a top choice for outdoor kitchen floors due to their high strength and low maintenance needs. These pavers do not soak up water or grease, which makes them very hard to stain. Homeowners often pick 2cm porcelain pavers for residential cooking areas because they can handle heavy use and spills without damage.
Modern outdoor pavers have high mechanical strength, which helps them stay in good shape even in busy areas. They are made to be dense and tough. This means they do not crack or chip as easily as natural stone or concrete when things are dropped on them. Because they are frost-resistant, they work well in places with cold winters and hot summers. You can trust them to last for many years in any climate.
Safety is key in a kitchen where water or oil might spill on the floor. Most outdoor pavers are made to be slip resistant to help prevent falls. Since they do not absorb moisture, mold and moss have a hard time growing on them. You can clean most messes with just a quick spray of water or a simple pH-balanced soap. They never need sealing, which saves you both time and money on upkeep.
Select a product rated for how you will use it. While 2cm pavers work for most homes, 3cm porcelain pavers are better for high-traffic commercial spots. To get the best results, all pavers must be sand-set on a firm base. This method allows for proper drainage and keeps the floor level. If you need help choosing, our team can give you free project design support to plan your space.
Plan an outdoor kitchen floor by mapping cooking, preparation, serving, and guest circulation zones before selecting the paver layout. Clear paths keep guests away from hot equipment, while a coordinated plan for appliances, utility access, drainage, edges, and sand-set installation reduces awkward cuts and later changes.
Success starts with a clear map of how you will use the space. Consider where the heat is, where the food stays, and where your friends sit. A smart layout makes your outdoor kitchen work like a pro chef's room. Choosing the right porcelain pavers for outdoor kitchen floors is a key part of this plan. These pavers handle the weight of heavy grills while staying easy to clean.
Before you lay any stone, mark your zones with chalk or tape. This helps you see how much room you have for prep and sink work. Most people need three feet of counter space for prep. A well-planned floor avoids traffic jams when the grill is hot.
Plan these key areas before installation.
The core of any kitchen is the work triangle. This is the path between your grill, the sink, and the fridge. Keep these three spots close enough to reach but far enough to stay out of each other's way. Using porcelain pavers for outdoor kitchens ensures this high-traffic area is safe. These pavers are made to resist slips, even when the floor gets wet during a rain shower.
Safety is also about how the floor handles spills. Grease and oil can make some floors very slick. But porcelain does not soak up liquids, so spills stay on the top. This makes it easy to wipe them up before someone slips. Using moisture tolerant materials like porcelain helps keep your base stable. This is vital in places with lots of rain or damp air.
Your guests want to be near the action but not in the way of the cook. Plan a walking zone that leads guests to the bar or dining area without crossing the prep zone. A four-foot path is usually enough for two people to pass each other. If you have a small space, use smaller pavers to define the edges of these paths. This helps people know where to walk without needing signs.
Think about the way you turn the pavers as well. Laying them in a long line can make a narrow space look longer. For a wide area, a grid pattern with 24x24 inch tiles creates a modern look. This large format style is a top choice for luxury homes. It gives the floor a smooth feel that flows from the house to the yard. This look is why many people pick porcelain for high-end projects.
One big mistake is trying to fit pavers around grill gear after it is in place. It is better to lay the entire floor first. This gives you a flat, level base for your grill islands and cabinets. When you set your grill gear on top of the pavers, you avoid weird cuts and gaps. It also makes it easier to replace a grill later if you want to buy a new one.
Plan the floor, cooking equipment, cabinets, and service lines as one coordinated layout. Hardscape.com porcelain pavers are installed with a sand-set method, so base preparation, drainage, edges, and cuts should be reviewed before work begins. Coordinate appliance placement and access points with the project designer and installer. This care supports a clean, cohesive result.
Choose verified stain-resistant porcelain pavers, then plan a simple cleanup routine around a soft broom, water, and mild pH-balanced soap. In a cooking area, prompt cleanup of grease, food, and drink spills supports safer footing. Hardscape.com samples let you evaluate color and cleanup in your own setting.
Outdoor kitchens face many mess risks. Grease from a grill or juice from a party can hit the floor. If you use porcelain pavers for outdoor kitchen floors, you gain a big edge. These pavers do not soak up liquids. This makes cleanup fast and simple. You can plan for mess by picking the right tools and knowing how porcelain works. Messes stay on top where you can see and clean them.
Most natural stone has small holes that trap oil and dirt. Porcelain pavers are unlike most stone because they are non-porous. This means water and oil stay on top of the surface. The EPA notes that moisture control helps prevent long-term damage in outdoor spots. Since porcelain does not absorb moisture, stains do not set deep into the tile. You can wipe up a spill with a damp cloth or mop. This makes it a great choice for active cooking areas.
Grease and food stay on the surface rather than sinking in. This keeps your kitchen floor looking new for years. You do not need to worry about long-term marks from wine, grease, or fat. The way porcelain works in damp spots is a big gain for any host. It makes porcelain pavers for outdoor kitchens a top pick for home chefs. Your floor will resist mold and mildew because water cannot get inside the tile.
You do not need harsh acids or toxic soaps to clean your pavers. A broom and a garden hose can handle most daily dirt. For sticky spots, use a pH-balanced soap and warm water. Do not use tools that might scratch the tile. Since porcelain is so tough, it stays strong through heavy use and foot traffic. Also check your sand-set joints often. All porcelain paver jobs must use a sand-set method to work well over time.
A few simple tools can keep your floor clean:
If you see dirt in the joints, a light spray from a hose will help. Avoid high-pressure washers close to the joints. This protects the sand that holds the pavers in place and aids drainage. You never need to seal these pavers. This saves you time and money on upkeep. It also keeps the floor safe and clean for your guests. Routine care takes just a few minutes each week to keep the space bright.
Before you buy, you should see the pavers in your own space. Each color shows dirt and dust in its own way. Getting samples lets you test cleanup for yourself. You can pour oil or juice on the tile to see how easy it is to wipe off. This helps you pick the best look for your cooking area. It also shows you how the surface feels when it is wet or dry. Seeing the tiles in person helps you make a firm choice.
Testing helps you plan your layout and color scheme too. You might want a dark color near the grill to hide ash or coal. A light shade might work well in dining spots to keep the floor cool. Hardscape.com gives design help for these choices. Using samples and design help ensures your porcelain pavers for outdoor kitchen floors are both pretty and easy to own. You can see the final result before the first paver is set in the sand.
Create design continuity by coordinating the outdoor kitchen floor with nearby dining, pool, walkway, and seating areas. Repeating a paver color, scale, or laying direction can connect the zones visually. Hardscape.com samples and project design support help compare those choices in the light and context of the property.
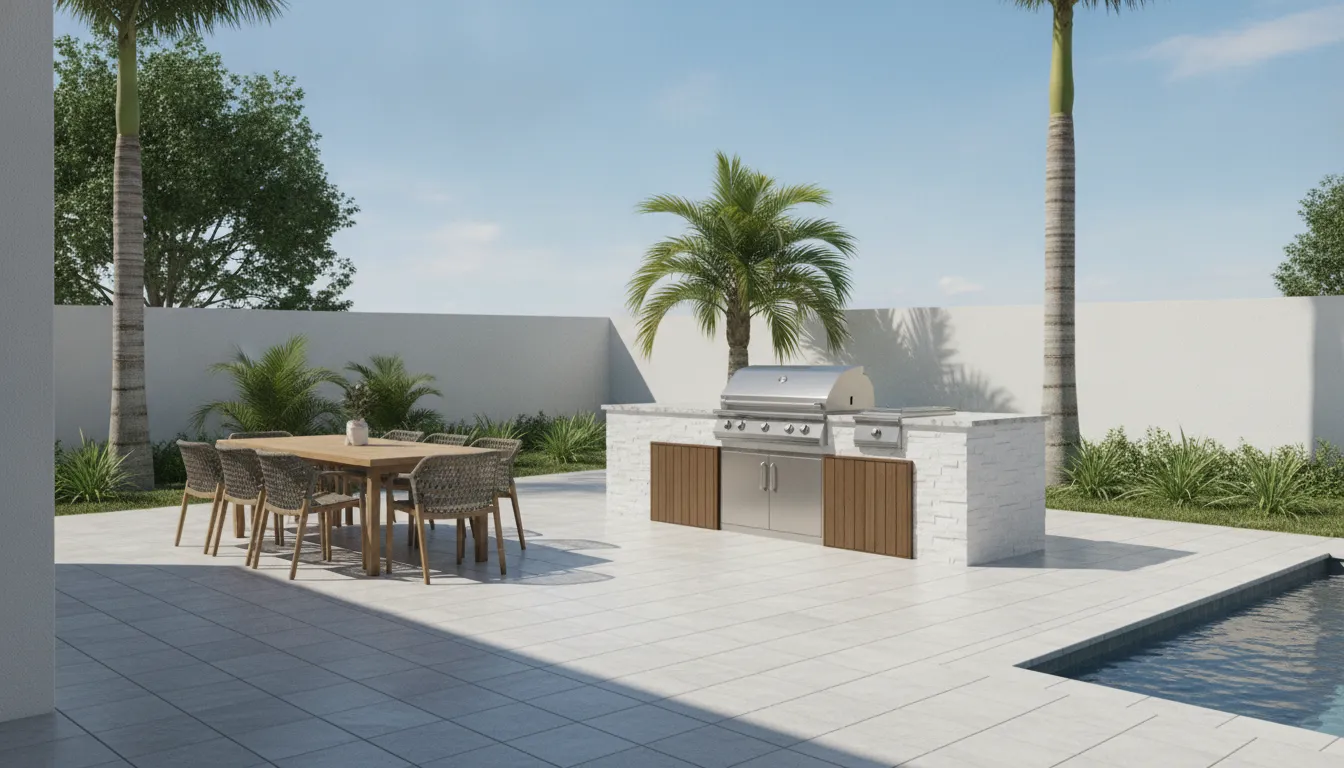
When you build an outdoor kitchen, you want a look that fits your whole yard. A unified space feels like a part of your home. Using the same porcelain pavers for outdoor kitchen floors and your deck helps create this flow. This choice makes the move from cooking to dining feel smooth. It also helps a small yard look far larger than it is. Many homes in Florida use this style to link indoor and outdoor living areas.
You can use matching items to tie zones together. This includes your pool area, walkways, and seating spots. Many people choose large format pavers for these tasks. These tiles, often 24x24 inches, create a clean and modern look. They have fewer grout lines, which makes the floor seem like one solid piece. This smooth style is great for outdoor kitchens where you move heavy chairs or carts.
Color choice is also key for a good match. You should pick a shade that works with your home's walls and roof. It is smart to see paver samples in real sunlight. Indoor light can make colors look unlike they do outside. Seeing the item next to your lawn or pool helps you make the best choice. This step prevents a mismatch that could ruin the flow of your space.
A well-planned space looks at more than just the floor. Consider how your pavers work with counters and cabinets. Porcelain is a top choice for these areas because it is so dense. It does not soak up liquids or food spills. These moisture-tolerant materials are best for outdoor living. They keep their look even after years of rain and sun.
Good design also looks at how light hits the surface. Other textures can change how a color feels all through the day. Porcelain is made to be slip-resistant, which is a must for kitchen safety. Experts found that many things, not just roughness, change how safe a floor feels. Using one item for all your paths and decks ensures a safe walk. This is helpful when you are taking plates of food or drinks.
Planning a large project can feel like a big job. Project design support can simplify these decisions. Our team gives design support to help you see the final look. We can show you how other pavers will look in your own yard. This helps you choose between standard and heavy-duty tiles for each zone. Getting this help early can save you time and money. Our experts can guide you from the first sketch to the final stone.
| Material. | Best Use. | Visual Impact. | Setup Method. |
|---|---|---|---|
| 2CM Pavers. | Outdoor kitchen floors. | Clean and modern. | Professional sand-set. |
| 3CM Pavers. | High-traffic paths. | Bold and strong. | Professional sand-set. |
| Cobblestones. | Accent borders. | Classic and textured. | Professional sand-set. |
Picking the right thickness is key for a long-lasting floor. While 2CM tiles work for most homes, 3CM tiles are better for spots with heavy gear. Both types offer the same low-maintenance perks. They do not need sealing and are easy to wash with water. By choosing the right paver for each task, you ensure your outdoor space stays great for a long time.
A successful sand-set porcelain paver installation depends on a properly prepared and compacted base, planned drainage, stable edge restraint, and coordinated cuts. The kitchen layout, appliances, access points, and utilities should be reviewed before installation begins so the finished floor is cohesive, level, and practical to maintain.
Planning is the first step for a great yard. When you pick porcelain pavers for outdoor kitchen floors, use a sand-set way. This choice helps your floor stay strong and flat for a long time. Sand-set work does not use glue or wet mud. Instead, it uses a deep base of stone and sand. This layer lets water flow through the ground. It also lets the earth move without breaking your new tiles.
The ground under your kitchen needs to be very firm. You start by digging out the dirt. Then, you add layers of crushed stone. Each layer must be packed down tight. This base stops the pavers from sinking later. A good base is the key to a level floor. It gives the tiles a solid place to rest. This is vital when you have heavy grills and cabinets on top.
You can find more tips in our high-end outdoor paving guide. It shows how expert work leads to the best results. A flat floor is safer for your family and guests. It also makes it easier to move your kitchen tools. You will spend less time fixing gaps and more time cooking outside. It is a smart way to keep your outdoor living area flooring in top shape.
Outdoor kitchens face rain and spills every day. Plan where that water goes. Proper moisture control keeps your base from washing away. Your floor should have a slight tilt. This tilt leads water away from your home or pool. Since porcelain does not soak up water, the liquid stays on top. A sand-set system helps drain this water into the soil. This keeps your floor dry and safe to walk on.
Porcelain tiles have very low water soaking. This trait makes them perfect for damp outdoor spaces. You will not have to worry about mold or ice damage. The sand between the pavers also lets water pass through. This keeps your kitchen area fresh and clean after a storm. It also keeps your floor from getting slippery when you cook.
Large grills and pizza ovens are heavy. Plan your floor layout around these items. Some areas may need a thicker base to hold the weight. It is also good to think about where your gas and water lines go. These pipes must be set before you lay the sand and pavers. This step saves you from taking up tiles later to fix a pipe. Planning ahead makes the job much faster and easier.
You also need a strong border for your floor. This keeps the sand and pavers in place. A good pro will use plastic or metal strips to hold everything tight. Our team can also help with your vision. You can request free project design support today. We help you see how the floor will look with your tools. Good planning leads to a floor that lasts for many years.
Before ordering porcelain pavers for an outdoor kitchen floor, confirm the layout, traffic paths, appliance locations, utilities, drainage, product thickness, paver size, and color. Review physical samples and coordinate every detail with the project designer and sand-set installer before work begins to avoid preventable layout conflicts.
Good planning is the secret to a good outdoor build. When you pick porcelain pavers for outdoor kitchen floors, you are choosing a type that resists stains and handles high heat. Because porcelain stoneware tiles have high mechanical strength and low water absorption, they are a top choice for these heavy-use zones.
You must map out every part of the site before the first paver goes into the sand. This early work helps you avoid big costs or changes later in the build. It also helps your team work faster once they arrive.
An outdoor kitchen needs more than a grill and a sink. Consider how people move through the area while you cook. Traffic paths should stay clear to prevent trips near hot zones or sharp tools.
Plan for wide paths if you host many guests often. Think about where you will stand to prep food and where guests will eat. A good layout makes the space feel open and keeps the chef safe. Also consider how the sun hits the kitchen during the day to plan for shade.
Use this list to guide your planning process:
Heavy tools like pizza ovens and big fridges need a firm and level base. You must mark where these go on your floor plan before any work starts. Ensure your gas, water, and power lines are in place before the sand base is laid.
This stops you from having to pull up pavers later to add a pipe or a wire. If you have heavy traffic or big tools, 3CM porcelain pavers may be the best bet for extra support. Planning for these items now saves time and money later.
Working together is key when building a floor that lasts. Check the base edges with your team and ensure all cuts are clean. A well-laid floor makes your outdoor kitchen a place you can enjoy for many years with very little work.
Choose an outdoor kitchen paver by matching a verified product to the project use, expected traffic, layout, and surrounding materials. Compare physical samples outdoors, confirm the selected thickness is appropriate, and coordinate the sand-set installation plan. Hardscape.com can help homeowners and designers evaluate these decisions before ordering.
You must pick the right thickness for your porcelain pavers for outdoor kitchen floors. Most home projects use 2CM pavers because they are strong and easy to move. These pavers work well on patios and in cooking areas. If you plan to build a business space or think you will have heavy traffic, 3CM pavers may be a better choice. For the most hard jobs, 5CM options give you even more strength. Each size stays tough, but your choice depends on how you plan to use the area. Most home kitchens do not need the extra bulk of thick slabs. You can see our full range of 2CM porcelain pavers to find the best fit for your home. Picking the right thickness ensures your floor can handle the weight of heavy grills and outdoor tools without any issues.
The thickness you choose affects how long your floor will last. A 2CM paver is plenty for most backyards in Florida. They stay strong in the heat and do not crack easily. If you have a large outdoor kitchen with heavy stone counters, you might look at 3CM slabs. These are made for high-use areas and can hold more weight. Using the right size saves you money and time. It also makes the job of laying the pavers much easier for your team. We can help you find the right match of cost and strength for your site.
Safety is key when you cook outside. You need a floor that stays safe even if it gets wet. Modern porcelain is made to be slip-resistant, which helps prevent falls near grills or sinks. Studies show that many things affect how well a floor resists slips. This makes picking a type made for outdoor use key. Research on porcelain stoneware tiles shows they have low water absorption and stay strong in damp areas. This low porosity also means they resist stains from food and drinks. You will not need to seal these pavers to keep them clean. Most spills will wash away with simple pH-balanced cleaners. This makes them much easier to manage than natural stone. Since outdoor kitchens see a lot of grease and food drops, this stain resistance is a huge help for owners.
The look of your outdoor kitchen should match your home. Many people choose large format pavers like 24x24 inch tiles. These create a clean, modern look with fewer grout lines. You can use these to build a smooth path from your house to your cooking area. When you plan your layout, remember that all our pavers must be sand-set. This method helps your floor stay level and last a long time. It also allows for better water flow. You can learn more about this in our luxury outdoor paving guide.
Choosing a paver is a big task. You should talk to a pro to make sure your pick fits your needs. Our team can help you check if a paver can handle the traffic and load of your specific project. You can request a free project design to see how your kitchen will look. This helps you avoid mistakes before you buy any material. Our experts know how these pavers work in the Florida sun and rain. We can guide you through every step of the process. This support makes it easy to get the best result for your home.
Porcelain pavers for outdoor kitchen floors raise practical questions about suitability, slip resistance, thickness, and installation. The answers below summarize the key planning points: select an outdoor-rated product, confirm project-specific requirements, evaluate samples, and use a coordinated sand-set installation plan.
Porcelain pavers are a great choice for outdoor kitchen floors. These pavers are very strong and do not soak up water. They resist stains and frost, which makes them easy to keep clean in a kitchen. Hardscape.com states these pavers are perfect for these spaces because they last a long time. They stay looking new even after many years. They work well for homes that need a floor that can handle heavy daily use.
Yes, porcelain pavers are safe for outdoor kitchens. These pavers are made to be slip-resistant, which makes them a smart pick for high-traffic areas where spills might happen. A study found in PMC shows that surface conditions play a big role in safety. Because these pavers do not soak up liquids, they are safer than many other floors. This helps keep your kitchen area safe for your family and guests during a meal.
For most home outdoor kitchens, 2CM porcelain pavers are the best choice. These pavers are strong enough for daily use and are easy to maintain. They offer a great mix of style and strength for a patio space. Hardscape.com notes that 2CM pavers are perfect for home floor use. If you have a space with very heavy traffic, you might need a thicker 3CM paver instead to ensure your floor stays strong and safe.
All porcelain pavers must be sand-set when used for an outdoor kitchen floor. This method helps the floor last a long time and allows for good drainage when it rains. As stated by Hardscape.com, sand-set is the only way these pavers should be put in. This type of layout is much better than other old ways. It keeps your floor from cracking or moving as the ground shifts over time.
Turn the ideas in this guide into a coordinated plan before ordering materials or scheduling installation. Hardscape.com can help you compare samples, review the outdoor kitchen layout, and plan the sand-set paver system around cooking, dining, circulation, and the surrounding outdoor space.
Waiting to pick your floor can lead to project stops and higher costs for repairs later. Each week you wait is a week you lose for using your new space with friends and family. Starting your design now makes sure you get the best pavers before the busy building season begins. Our team can help you pick the right size and look for your exact needs today. You can see our full range of 2CM porcelain pavers to find the best match for your home. You will save time and avoid the stress of last-minute changes to your outdoor living area. Good planning now means your kitchen will be ready for many years of heavy use.
Ready to start? Call +1 561-677-1383 to request a free project design and order porcelain paver samples.


